
Introduction
In today’s rapidly evolving digital landscape, email is more than just a communication tool; it has also become an important asset for business. Users now demand a fast, secure, and easy-to-access email platform. While Hover Mail provides basic email service, when it comes to advanced features, cloud access, and security, Microsoft 365 Outlook becomes a powerful option. The main reason why users need to migrate Hover Mail to Microsoft 365 Outlook which contain cloud-based access, strong security, better email migration, and integration with other tools. However, shifting data is not as simple as it seems. One wrong step will corrupt your data. Through this blog, we provide a step-by-step guide on how to transfer Hover Mail data into Microsoft 365 Outlook with the help of Manual and professional methods. So that users can choose according to their requirements.
Also read: Move ATT.net Email to Yahoo Mail Account
Table of Contents
ToggleHover Mail VS Microsoft 365 Outlook
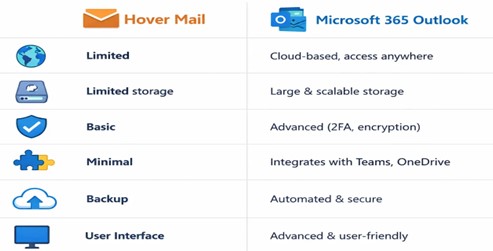
What are the reasons to migrate Hover Mail to Microsoft 365 Outlook
Cloud-Based Accessibility
Microsoft 365 Outlook is a cloud-based platform, which means users can access their emails anytime, anywhere, and from any device. It is not like traditional email services; without any dependency, the cloud system provides flexibility and remote access on a single device.
Advanced Security Features
Outlook offers enterprise-level security, such as:
- Email encryption
- Anti-phishing and anti-malware protection
- Two-factor authentication (2FA)
This feature helps to protect sensitive data and prevent cyber threats, making it more secure than the basic email service
Large & Scalable Storage
With Microsoft 365, users get large mailbox storage up to 100 GB or more, allowing users to store emails without worrying about space limitations.
Integration with Microsoft Ecosystem
Outlook smoothly integrates with another Microsoft tool, such as:
- Word
- Excel
- Teams
- OneDrive
The integration improves productivity and allows better collaboration within the organization
Better Email Management
Microsoft 365 Outlook provides advanced email management features like
- Focused inbox
- Email rule & filters
- Search folders
- Calendar & task management
These features help to increase workflow and help to organize email efficiently
Method 1: Manual Method to Migrate Hover Mail to Microsoft 365 Outlook
The manual method is a free and hassle-free way to migrate your emails using IMAP configuration. In this approach, you connect your Hover Mail account with Microsoft 365 Outlook and sync your mailbox data.
This method is suitable for users who have limited data and less technical knowledge.
Step-by-Step Process
Step 1: Enable IMAP in Hover Mail
- Log in to your Hover Mail account
- Go to Settings
- Permit access to IMAP
Step 2: Collect IMAP Server Details
You need the following details:
- IMAP Server: imap.hover.com
- Port: 993
- Encryption: SSL
Step 3: Add Hover Mail Account in Outlook
- Open Outlook on your system
- Go to File > Add Account
- Enter your Hover Mail email address
Step 4: Configure Account Manually
Choose Manual setup / Advanced settings
Select IMAP account
Enter:
- Incoming server (IMAP details)
- Email address & password
Step 5: Sync Emails
- Click on Login / Connect
- Outlook will start syncing emails from Hover Mail
- Wait until all folders (Inbox, Sent, Drafts) are loaded
Step 6: Access Emails in Outlook
- Once synced, you can access Hover Mail emails in Outlook
- Emails will appear in the respective folders
Drawbacks of the Manual Method
- Time-consuming
- Data Loss or corruption Risk
- Required Technical Knowledge
- No Bulk Migration Required
- No Advanced filter option available
Method 2: Automate Method to Migrate Hover Mail to Microsoft 365 Outlook
Many of individual looking for a reliable tool, and they are getting frustrated with the trouble that occurs during migration. Individuals want to move Hover Mail to Outlook with using advanced features. Migrate Hover Mail to Microsoft 365 Outlook with the DataVare Mail Migration Tool. This transformation makes the data more reliable and efficient, which are user find in this digital market. This software overcomes all the common problems that many users usually go through, including time-consuming, data loss risk, complex interface, no advanced features, and more. This tool is specially designed to meet the demands of the Users. Additionally, it supports bulk migration, filter options, and a simple interface. Then, you can easily operate this application with the help of the given steps below.
Automated Steps to Migrate Hover Mail Mailbox to Microsoft 365 Outlook
Step 1: Set up and launch the application on your system
First, you need to download the application on your PC
Step 2: Add Source Account (Hover Mail)
- Enter login credentials, Hover Mail
- Fill in the IMAP server details
- Click on the login or connect option
Step 3: Preview Mailbox
- Software shows mailbox folders: Inbox, Sent, Draft, etc
- User takes a preview of the data
- You can choose a selective folder or an email
Step 4: Select destination (Office 365)
- Select output option in Office 365/ Outlook
- Enter Microsoft 365 account credentials
Step 5: Apply Filter
- Use the data range filter option
- Select Specific folders or emails for migration
- Skip the unnecessary data
Step 6: Choose Folder
- Select the target folder in the Outlook mailbox
- Create a new folder
Step 7: Start migration
Click on the start migration option, and the tool will automatically start your migration.
Benefit of migration
- Migration makes the process faster and automates
- During the conversion, there is no need for data loss or corruption
- This tool provides bulk email migration
- Tool provides advanced filtering option during conversion
- User can save their time and effort by using this software
Conclusion
In this Blog, various method of migrating Hover Mail to Microsoft 365 Outlook is explained. Now, it depends on the user’s requirement, which types of methods users choose. 2 different methods will be explained in this blog, such as the Manual Method or Professional Method; both ways are the best on its own way. Manual Method provides free migration, but along with their limitations. But, on the other hand, the Professional Method provides expert-level security during migration, and now people are becoming more aware of this professional method. It totally depends on the needs of the users.
FAQs
Is this tool safe for migration?
Yes, it is a secure tool that helps users to smoothly migrate their data
Can I migrate selective emails only?
Absolutely, you can migrate selective data only as per your requirements
Which method is better?
For small data, the manual method works, but for large and secure migration, a professional will recommend it
Does the tool support bulk migration?
Yes, the tool supports bulk migration, and users can effortlessly migrate data without any trouble